Customer Managed Encryption Keys (CMEK)
ClickHouse Cloud enables customers to protect their services by leveraging their own Key Management Service (KMS) key. We utilize the ClickHouse's built-in Virtual File System for Data Encryption feature to encrypt and protect your data. The data encryption key used by the ClickHouse Cloud service is then encrypted and protected using customer's provided KMS key in a process known as envelope encryption. All the service needs for this to work is access to your KMS key to decrypt & encrypt the data encryption key at runtime.
This feature is exclusive to ClickHouse Cloud Production services, to enable this feature please contact support. Customer managed encryption keys must be specified at service creation time, existing services cannot use this option, please check Backup and Restore for an alternative option.
Currently supported KMS providers:
- AWS Key Management Service for services hosted on: AWS
Coming soon:
- Azure Key Vault for services hosted on: Azure
- GCP Cloud Key Management for services hosted on: GCP
- Hashicorp Vault for services hosted on: AWS, Azure, GCP
Deleting a KMS key used to encrypt a ClickHouse Cloud service will cause your ClickHouse service to be stopped and its data will be unretrievable, along with existing backups.
Step 1. Creating a KMS Key
Using AWS KMS
You can create the AWS KMS key via the AWS Console, CloudFormation stack, or using a Terraform provider. We walk through the steps for each below.
Option 1. Manually create a KMS key via the AWS Console
Note: If you already have a KMS key you want to use, you can move on to the next step.
-
Login to your AWS Account and navigate to the Key Management Service.
-
Select Customer managed keys on the left.
-
Click Create key on the upper right.
-
Choose Key type "Symmetric" and Key usage "Encrypt and decrypt" and click Next.
-
Enter an alias (display name) for your key and click Next.
-
Choose your key administrator(s) and click Next.
-
(Optional) Choose your key user(s) and click Next.
-
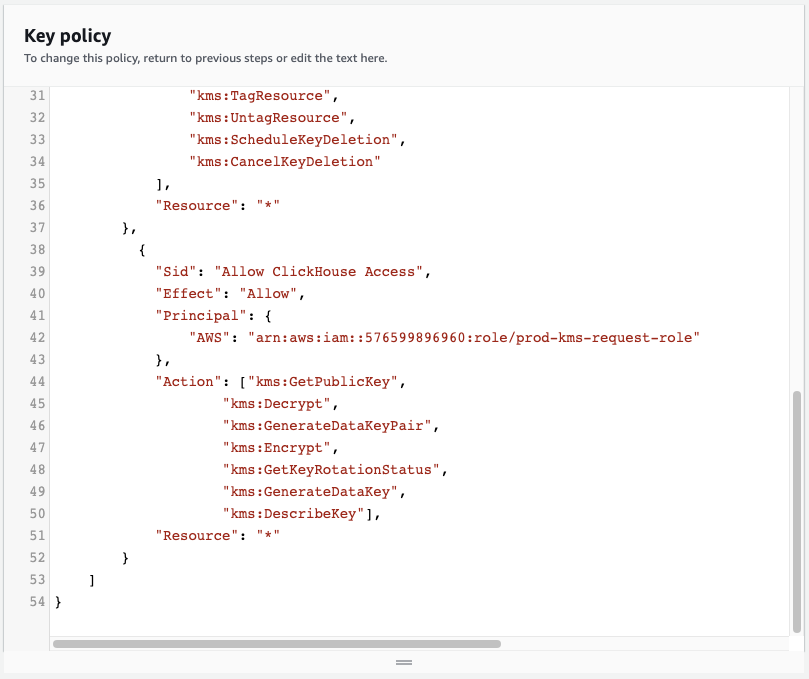
Add the following code snippet at the bottom of the Key policy:
{
    "Sid": "Allow ClickHouse Access",
        "Effect": "Allow",
        "Principal": {
            "AWS": "arn:aws:iam::576599896960:role/prod-kms-request-role"
        },
        "Action": ["kms:GetPublicKey",
        "kms:Decrypt",
        "kms:GenerateDataKeyPair",
        "kms:Encrypt",
        "kms:GetKeyRotationStatus",
        "kms:GenerateDataKey",
        "kms:DescribeKey"],
        "Resource": "*"
}
-
Click Finish.
-
Click the alias of the key you just created.
-
Use the copy button to copy the ARN.
Option 2. Configure or Create a KMS key using a CloudFormation stack
ClickHouse provides a simple Cloud Formation stack to deploy the AWS Policy for your key. This method supports both existing KMS keys and creation of new KMS keys for ClickHouse Cloud integration.
Use an existing KMS key
- Login to your AWS account.
- Visit this link to prepare the CloudFormation template.
- Enter the ARNs of the KMS key(s) you want to use (comma separated with no spaces in between).
- Accept "I acknowledge that AWS CloudFormation might create IAM resources with custom names." and click Create stack.
- Make note of the
RoleArnand theKeyArnin the stack output as you will need these for the next step.
Create a new KMS key
- Login to your AWS account.
- Visit this link to prepare the CloudFormation template.
- Accept "I acknowledge that AWS CloudFormation might create IAM resources with custom names." and click Create stack.
- Make note of the
KeyArnin the stack output as you will need this for the next step.
Option 3. Create a KMS key via Terraform
For users who want to deploy the key via Terraform, check out the AWS provider documentation here.
Step 2. Starting a ClickHouse service with Customer Managed Encryption Keys
-
Log into your ClickHouse Cloud account.
-
Go to the Services screen if you are not already there.
-
Click New Service.
-
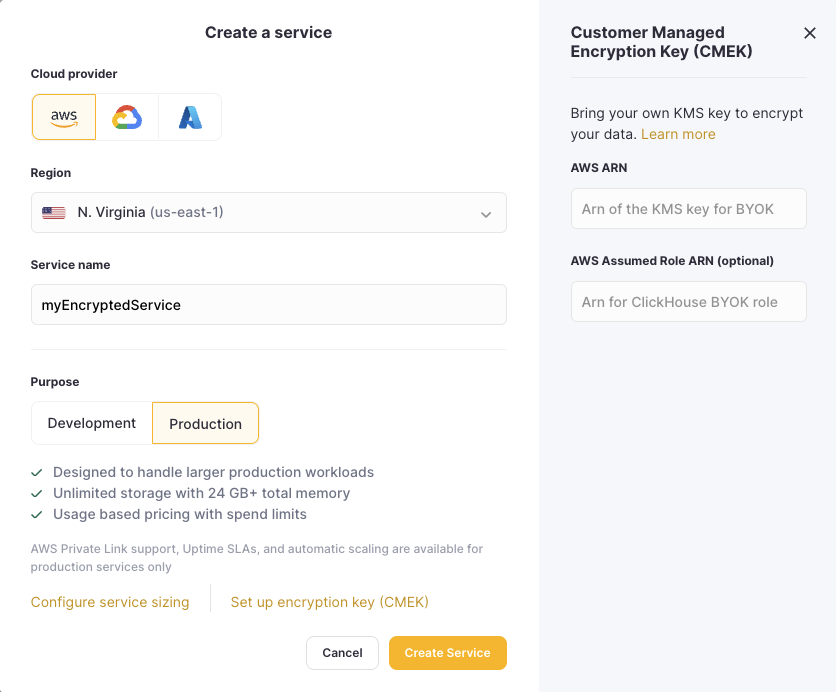
Select your Cloud provider, Region and name your service.
-
Click Set up encryption key (CMEK) - example is shown using the AWS KMS provider.
-
Paste your AWS ARN in the field on the right side of the window.

-
The system will check to ensure the encryption key is accessible.
-
Once you see the Valid message above the AWS ARN box click Create Service.
-
A key icon will show in the upper right corner of the service tile on the Services screen to let you know it is encrypted.

Backup and Restore
Backups are encrypted using the same key as the service to which they are associated. Restoring an encrypted backup will create an encrypted instance that uses the same KMS key as the original instance, the KMS key can be rotated if desired, please check Key Rotation for details.
An encrypted instance can be created by restoring a non-encrypted backup and specifying the desired KMS key for the new service, please contact support for assistance.
KMS Key Poller
When using envelope encryption, we need to periodically confirm the provided KMS key is still valid. We check the access for the KMS Key every 10 minutes, when the access is not valid anymore we stop the ClickHouse service. To resume service, please reinstate access by following the steps on this guide and then start your service.
Due to the nature of this feature, it's not possible to recover a ClickHouse Cloud service after the KMS key has been deleted. To prevent this, most providers don't remove the key immediately and instead schedule it for deletion, please check your provider documentation or contact support for assistance on this process.
Key Rotation
Key rotation is supported within the same KMS provider. This action will re-encrypt the data encryption key using the new KMS key, this request is processed immediately without any downtime for your ClickHouse service. To perform this action please ensure access to both the configured KMS key and the new KMS key and contact support with the KMS key information.
Performance
As specified in this page, we utilize the ClickHouse's built-in Virtual File System for Data Encryption feature to encrypt and protect your data.
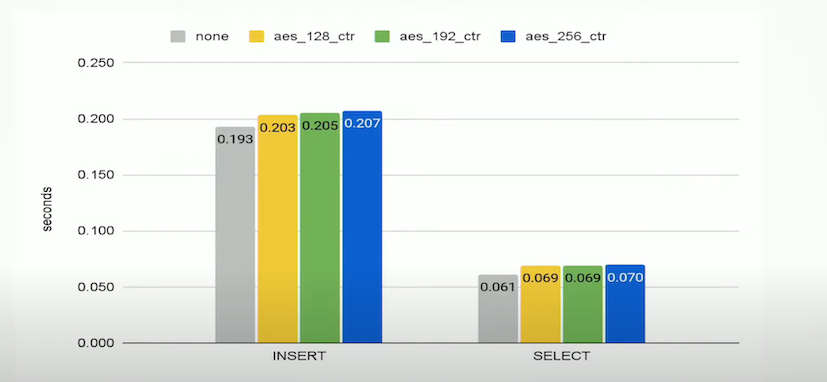
The algorithm in use for this feature is AES_256_CTR, which is expected to have a performance penalty of 5-15% depending on the workload:


